KILLSWITCH ENGAGEMENT : Everything You Wanted To Know About Kill Switches, But Was Afraid To Ask
Lane Sparber
A tutorial on the variety of kill switches and the different ways they can be wired in your guitar or bass.
SWITCHING ON
In the past ten years or so, no other guitar electronics feature I’ve seen can compare to the rise of the humble kill switch. Tom Morello from Rage Against The Machine elevated their use to an art form, but a HUGE percentage of my clients who play Metal also find them indispensable. A kill switch’s mechanics and implementation are usually extremely simple. However, there are many options (and some potential pitfalls) to be aware of when modding your guitar to include one.
This article aims to help you make the best choice for your instrument and how you intend to use the switch. Also, take heart: kill switches can be installed and will work with ANY guitar’s electronics - active OR passive. It doesn’t matter.
My standard caveat applies here: all kill switches are easy enough to implement and wire into your guitar’s circuit. But please DO NOT attempt any of the wiring changes outlined below unless you’re familiar with proper soldering methods and how to measure and drill out a new hole for your kill switch (if applicable). If you’re skittish about anything I’m about to outline here, please have your tech perform these mods.
TYPES OF KILL SWITCHES
When it comes to choosing a kill switch for your guitar, the options are almost endless. Before you start, think about how you want to use it and what will be most comfortable and intuitive for your needs. Will a blade or lever switch work, or would you prefer a simple push-button switch? How large physically would you like the switch to be? Where on the guitar should it be installed? Will the switch fit there? If you are ADDING a kill switch to the existing electronics, you’ll need to drill a new hole for it somewhere on your instrument, and this almost always devalues the guitar if that’s a concern. If you do NOT want to permanently modify your axe, you can simply replace one of your existing controls with the kill switch. For example, if you never use your volume (or tone) knob, a kill switch can take any of their places.

Common types of kill switches (NOT to scale): Top row left to right: standard toggle switch, “Bat” style toggle switch, metallic push button. Bottom row left to right: Arcade style switch, standard Gibson style toggle, and push button with integrated L.E.D. light – really cool!!!
WHAT YOU NEED
A kill switch requires the simplest of all switch types - a basic on/off two position model will work perfectly. An “STSP (single pull/single throw)” switch is ideal. STSP switches have only two contacts on the bottom, and the switch simply connects (or disconnects) these two terminals to each other when the switch is manipulated.
You can also use an “SPDT (single pull/double throw)” on/on switch if you like. These have THREE terminals on the bottom. In one switch position, the middle and TOP terminals are connected, and in the other position, the middle and BOTTOM terminals are connected. If you choose a switch like this, you’ll only be using two of the three terminals.
There are also two basic switch types regarding how they work physically - a switch can be momentary or latching. Momentary switches only make (or break) contact when you manipulate them; as soon as you take your hand off of the switch, it pops back to the way it was before you touched it. Latching switches do just what the name implies. It will stay in whatever state you leave it. By way of example, all pickup selector switches are latching; once you set the pickup selector on the neck pickup (for example), it STAYS there when you take your hand off of the switch. In ALMOST all cases, we want a momentary-style kill switch. An exception to this rule is if you’re going to use your pickup selector as a kill switch (like Tom Morello does), but if your guitar does this, then you obviously don’t need to add a kill switch!
Finally, the two types of momentary switches to consider - “always on” and “always off.” An “always-on” momentary switch has its contacts connected all of the time until you press or flip the switch. “Always off” switches are just the opposite; this type of switch’s terminals are NOT connected UNTIL you press or flip the switch. Which one of these types you need depends on how you want to implement your new kill switch.

Which brings us to…
HOW IT WORKS
All that a kill switch does is temporarily mute your guitar signal. There are two ways to do this, and one is far more effective than the other. For this article, I’ll be calling these two ways to wire in a kill switch the “Interruptive” and “Shorting” methods. Let’s take a closer look at each.
INTERRUPTIVE KILL SWITCHES:
An “interruptive” kill switch does just what the name implies: it breaks the connection between the signal and output jack. For this method, you need the “always on” momentary switch type outlined above because this switch is in series with your signal. All you need to do is take the “hot” wire off your output jack and solder it to one side of the kill switch. Then run a wire from the other side of the kill switch to where the ORIGINAL wire was on the output jack.
I do NOT recommend or implement this type of kill switch for one reason: when you interrupt the signal in this manner, you’re creating a disconnected live “hot” wire in the guitar, which can be extremely noisy. It’s the same noise as when you have a guitar cable plugged into your amp with a bare connector on the other side: HUMMMMMM. Thus, I never use this type of kill switch wiring.
SHORTING KILL SWITCHES:
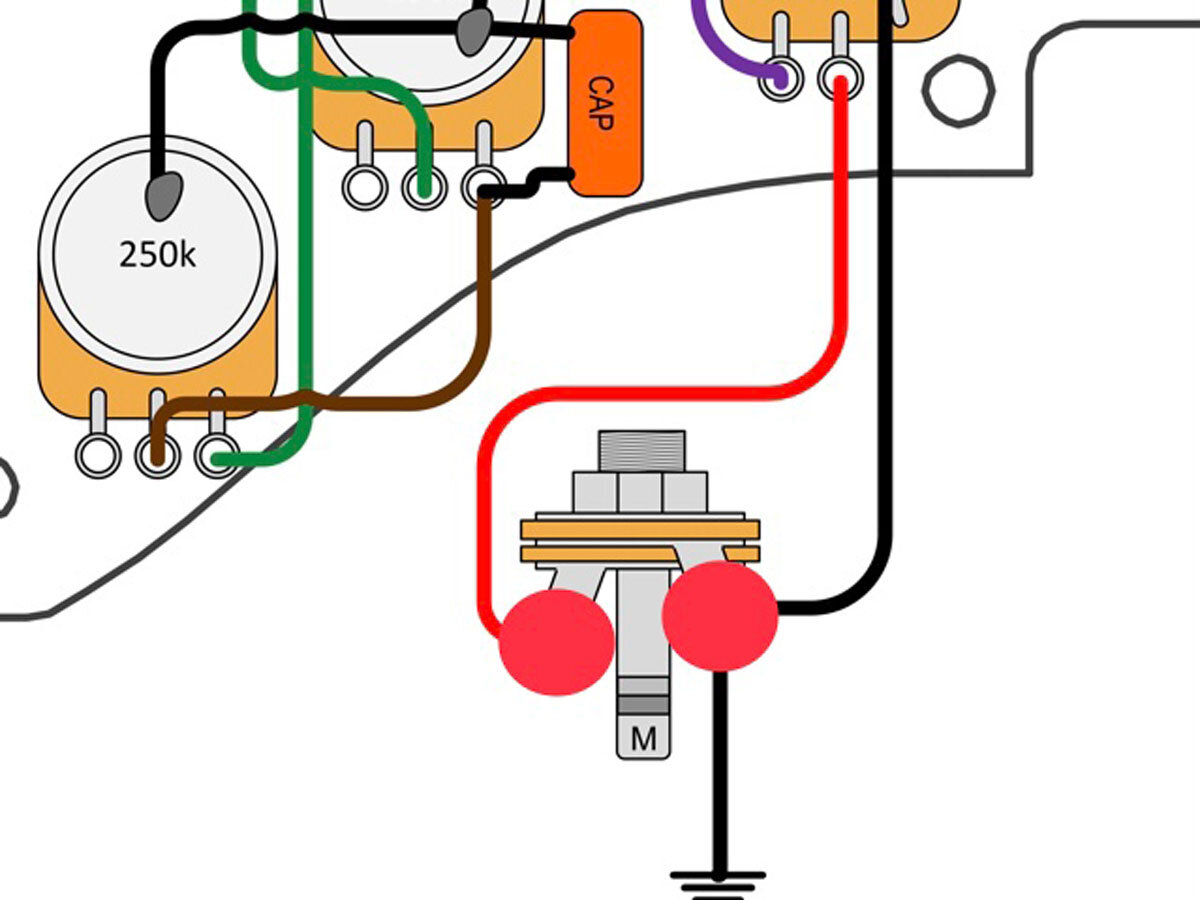
On the other hand, a shorting kill switch goes between your guitar’s output signal and ground. It’s a MUCH better method because when you press/flip the switch, it sends your signal right to ground. It is the same as when you roll your volume knob all the way down; it’s dead silent. In fact, one of the two best places to wire in the switch is right across the volume pot between the middle “wiper” terminal and ground (the pot’s casing). Conversely, you can wire your new kill switch across the output jack itself if that’s easier - it will do the same thing.

The red dots show you where to attach the two wires from the kill switch if you want to solder them to the volume pot. There’s no polarity here, so it doesn’t matter which wire from the kill switch goes to which lug on the pot.
The red dots in this pic show you where to wire up the two leads from the kill switch if you want to solder them to the output jack. There’s no polarity here, so it doesn’t matter which wire from the kill switch goes to which lug on the jack.
POP GOES THE WEASEL-Y SWITCH:
One last important tip I’d like to impart. If you get a pronounced popping noise when you activate your kill switch, the usual solution is to take a large value resistor and wire it directly across the two active terminals of the switch itself. I use a tiny 1/4 watt resistor, starting at ten megs of resistance (which is SUPER high). If it still pops, I will change that resistor for one with a lower value, such as an 8.2 meg version. I’ll then keep lowering and lowering the value until the pop gets quieter (it will seldom go away completely). DO NOT go below one meg, though, because if you do, you can begin to affect the output impedance of your guitar (if it’s passive). To reiterate, a certain amount of “pop” will always be there; we just want to get it as quiet as we can. Ironically, the more gain and distortion you use, the less pronounced the pop becomes (IMHO, this is due to the intense compression that high gain amps have).
SWITCHING OFF:
Implementing your own kill switch can be an extremely rewarding and fulfilling experience, and it’s easy with just a little know-how. They really do add a lot of additional functionality to any instrument. I sincerely hope I’ve helped educate you on how to choose the right switch for you and the best way to wire it into your guitar’s circuit.
Until next time…CHEERS, EarthQuaker Family!!!

Lane Sparber is an amp / guitar / bass / pedal tech who lives and works in Fresh Meadows, Queens, New York. He started repairing gear in his mid-teens, and he’s 46 now, so you do the math. When not causing mayhem in his workshop, he can be found desperately trying to hide his latest orchid purchases from the rest of his family. You can find him on Instagram at @amptech74 or on Facebook. Come say “Hello!”