A Basic Understanding & Guide to a Guitar Setup
Patrick Benson
You’re stuck at home with more time on your hands than you know what to do with, so you decide to pick up a guitar that you haven’t played in a while. You loved playing it over the years, but it’s lost its luster. Though it may seem like things are changing every day, your opinion of that guitar shouldn’t have to change as well. That lackluster feeling probably just means that it needs to be brought back into alignment. Your guitar should inspire you to keep playing every time you go to grab it. You owe it to that instrument and to yourself.
I would always recommend getting your instrument setup by a professional, but in these times, that may not be an option. Repair shops are closed or only taking in a certain number of clients to maintain a safe and healthy workplace. So, what can you do while stuck at home? Repairing instruments is a skill that takes years of hard work, dedication, and practice. This article won’t turn you into a professional overnight, but I hope to give you a deeper understanding of how to fix some of your instrument’s issues from home.
Like any trade, repairing and setting up instruments is an investment. A combination of experience, skills, and the right tools are needed to get the job done safely and as accurately as possible. The right tools can be a big expense, and if you’re only using them once in a blue moon, they’re probably not worth the investment. If you have the means and are passionate about doing the work on your own, below are several recommendations on tools/supplies you may already have in your home.
Some tools to help you along the way:
Assorted Flat and Phillips head screwdrivers (Stewmac set) and/or Jewelers Screwdrivers
Peterson Strobe Tuner (app or basic stuner)
Assorted Allen Wrenches (Standard and Metric)
Assorted Socket Wrenches (Standard and Metric)
Gibson Truss Rod Tool if you have a Gibson guitar
Vintage style Fender Truss Rod Tool (where the adjustment is at the heel of the neck)
Guitar Polish (I recommend Smith Pro Formula Polish and also this one from Stew Mac)
No.2 Pencil & Sharpener
Cleaning cloths (use sleeves of old t-shirts)
Steel Wool (extra fine 0000)
Neck Rest (if not, a small pillow or towel will work)
Yoga Mat (work mat, or old towel/rug)
First, get yourself set up and in a comfortable space with good lighting. If you are able to turn your coffee table or dining room table into a temporary work space I would recommend that. Place your work mat across the top of your workspace to protect your instrument and table. Place all of the tools that you may need to either side of where you’re working. You don't want to be reaching over your guitar with any tools and risk potentially dropping one on your instrument. If you don't have a neck rest you can use a small pillow or towel rolled up and place it underneath your headstock where the nut is. Now get comfortable, pour yourself a coffee (or tea), put on some music and let’s get started.
Some steps to a basic setup:
1. Play your instrument. Plug it in and play. Make mental notes of how the instrument sounds and feels. Do either seem odd to you? Keep these notes in the back of your mind while you’re working.
2. Evaluate the Neck and Truss Rod Adjustment. This is perhaps the most important and potentially dangerous step in this whole process, so proceed with caution. I would suggest reading more into truss rod adjustments if you are not familiar (i.e.Guitar Players Repair Guide by Dan Elewine). There are a few ways to evaluate the neck. Many seem to think that you can get an accurate read by just sighting the neck alone, however I would disagree. It’s good to sight the neck, but it’s more of a quick assessment rather than an accurate measurement. To sight the neck, simply hold the guitar so that you’re looking down from the headstock along the top edge of the bass side where the frets end. Turn the guitar around and sight down the treble side. What you’re looking for is an “up-bow”, “back-bow”, humps in the neck (usually where the neck joins the body), and high or loose frets that are usually found on older instruments (see drawing diagrams for examples). I usually evaluate the neck with a straightedge and feeler gauges, which give an accurate measurement (however, straight edges are not cheap, come in several sizes, and take practice in getting accurate measurements). For the sake of this article, we will skip to an easier (and free) solution - making your own straightedge. With your guitar in the upright playing position, place your right hand thumb on the low E string directly on the fret where the neck joins the body (typically frets 15, 17, or 19) and your left hand index finger on fret 1. What you have created here is a straightedge. Now, stretch your right hand index finger out and tap around frets 5-7 (however far you can stretch), making sure that there is some space under the string. A good guideline would be to put a business card between the fret and the string as you keep pressure on the fret. If a business card fits snug, then you’re in the general ballpark. If there is too much of a space, this means there is too much relief in the neck and the truss rod needs to be tightened. Too little space means the neck is too straight and the frets are touching the strings allowing for frets to buzz. We don’t want that. If this is the case, you’ll need to loosen the truss rod some. It’s very important to always loosen the truss rod before you tighten it and use extreme caution. Avoid sudden movements and don't use too much force. If you start to feel the truss rod cease up, STOP! Forcing a truss rod to tighten will cause the rod to snap and there is no going back from that. If you find yourself in this scenario simply back off a bit and leave it be. Further steps require deeper knowledge and you don't want to snap your truss rod, trust me. There are several different wrenches used for adjusting truss rods and if you bought your guitar new than it most likely came with the appropriate wrench size. Never adjust a truss rod with the wrong size wrench, it will end badly.
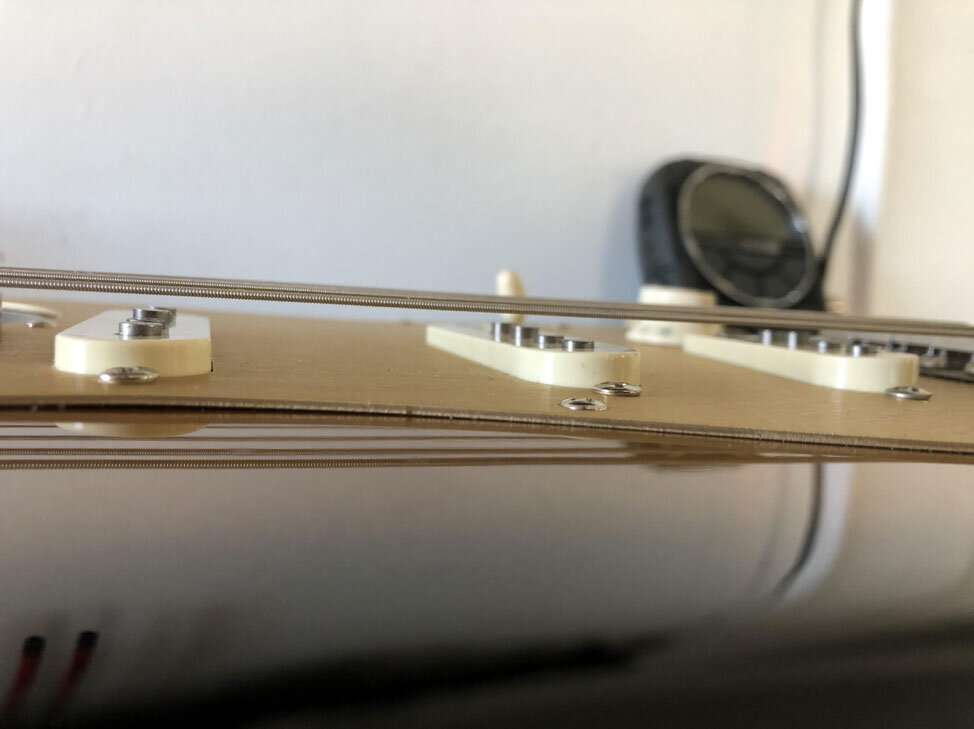
3. Adjust Bridge/Saddle Height. After getting the neck to the right measurement, you’ll need to get the string height at the bridge in the right place using the string action ruler (from StewMac) to adjust the bridge and saddles to the correct measurements. I base my measurements off the string action gauge holding down the string at the first fret and adjusting each saddle to .060” measuring at the 12th fret. This puts all of your strings automatically to the corresponding radius of your guitar, so you don't need to measure with any radius gauges. With your neck set to the proper relief and your bridge and saddles at the correct height, play your guitar and listen for any buzzing sounds. If you don't hear anything, you’re in the clear, but if you do, then further adjustments need to be made.
4. Check the Nut. Normally here is where I would adjust the nut height and file any slots if needed. However, this takes a lot of practice and skill to do so effectively, and the tools to get the job done properly are not cheap. You’ll need nut slotting files of various gauges and they take a bit of practice to get used to. It’s good to measure how high or low your slots are but for the sake of this article and the simple fact that most people don't have these tools, we will move onto the next step assuming the nut is where it needs to be. How you can measure the nut is similar to how we check for relief in the neck. Simply put your left hand index finger on the first fret and your right hand index finger on third fret and tap repeatedly. If there is a lot of space, your fret is too high. If there is little to no movement, your slot is too low, allowing for the string to touch the frets which will cause some buzzing when the string is played open. Further skills would be required if your nut is not where it needs to be. I plan to go into further detail about this and truss rod adjustments in another article, but for now we can move on.
5. Check electronics. While the instrument is plugged in it’s a good time to check the electronics to make sure everything is behaving properly. Gently wiggle the guitar cable at the output jack to see if anything cuts out. Turn the volume and tone pots up and down and listen for any scratching. Move any selector switches back and forth and listen for any cracks or pops. If everything is silent, you’re in the clear. If not, make notes of what’s happening and address the situation when the strings are off the guitar.
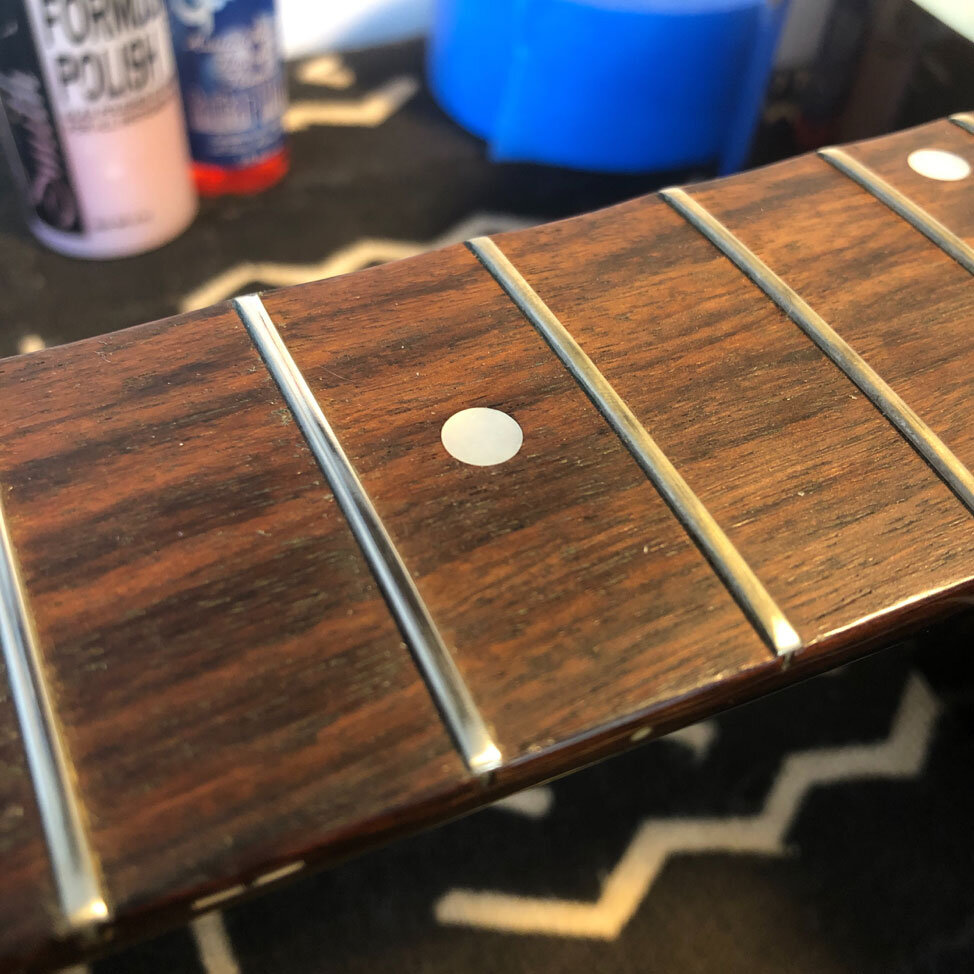
6. Remove Strings, Tape off Pickups, Polish Frets, and Oil the Fretboard. Next, remove those old strings, clean the guitar and tape off the pickups covering the pole pieces with painters tape. This will protect the pickups from getting damaged with steel wool debris. If you don't have fret guards (see photo no.1), no sweat. You can take blue painters tape and tape off the fretboard as shown (see photo no. 2). This will protect any scratching of the fretboard from the steel wool. Next, grab a small amount of steel wool (half the size of a penny) and roll it around until it forms a ball. Take the ball of steel wool and rub it back and forth over each fret and watch as the dirt and grime falls away until you see shiny new frets again. After each fret is polished, carefully vacuum up any remaining steel wool left on the guitar with a vacuum cleaner using a brush nozzle if you have one. Be sure to also get around the neck pickup pole pieces and neck joint as a lot of wool can collect there. After all of the steel wool is removed, remove any tape from the fretboard and lightly oil the fretboard with lemon oil on a shop towel and work it into the fretboard. No need to go overboard - a little goes a long way. This gets the fretboard wood back to looking healthy and playing smooth. If you have a maple fretboard, skip this step as it’s not good to use lemon oil on maple fretboards - dark fretboards only. (Tip: never use the same towel that you used to polish your guitar. Keep lemon oil and polish separate).


7. Clean and fix any electronic issues. While the fretboard is moisturizing, now is a good time to check any electronic issues that you may have come across. If a jack is loose, tighten it with the correct nut driver. If you heard scratchy pots, use just a few drops of contact cleaner into the open cavity and turn the pots as it’s going in. This will allow the cleaner to move around and get rid of any dirt and debris on the inside. Fixing electronics is a whole other discussion and can get very in-depth, as there are many issues guitar electronics can face. Assuming everything is working, we will tackle fixing electronics and common troubleshooting another time.
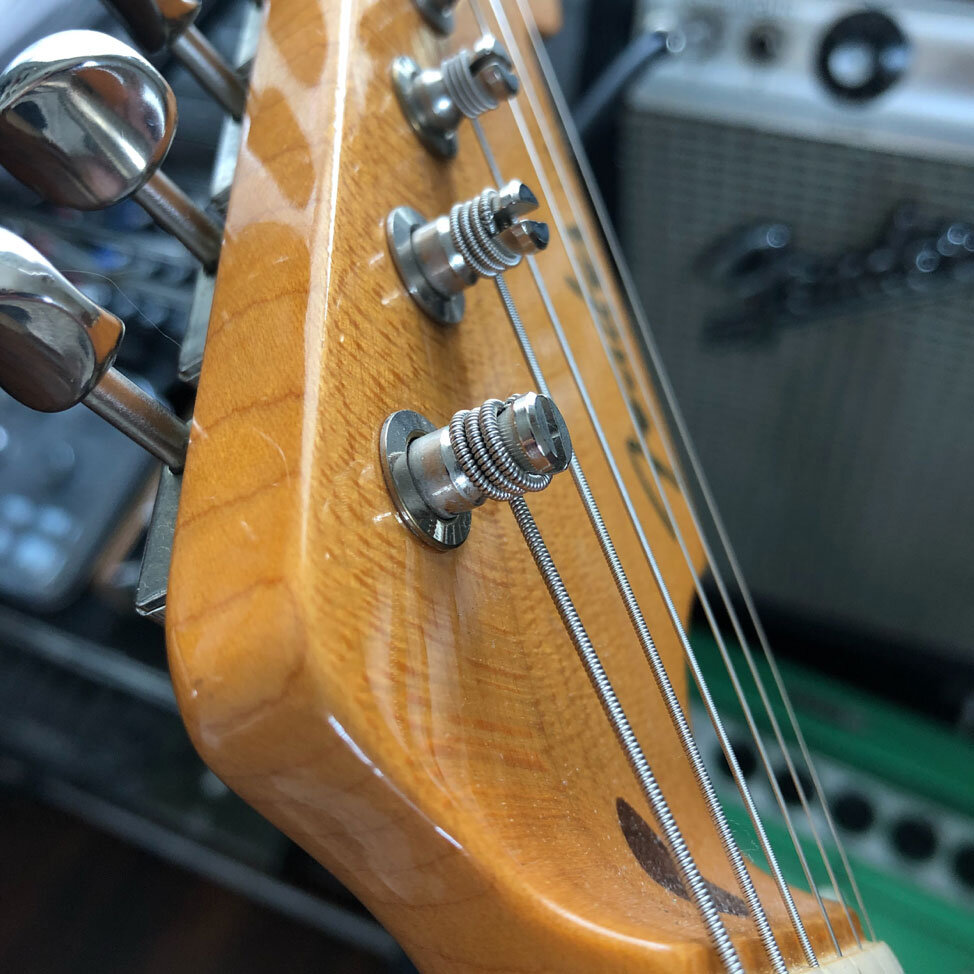
8. Restring. Now that you have checked the electronics and cleaned the fretboard it’s time to restring your guitar. There are many different ways and everyone has their methods but instead of going through every one I will just show you what I do on a couple of different styles of tuning machines. I always make sure there are several winds around the tuning post. You don’t really need any more than that and if you have less you can risk the string not staying in tune, and potentially snap. With string-thru style tuners I make sure that the string is sandwiched between one wind on top and two winds on the bottom. This secures the string properly in place. With top loaded Fender-style tuners I start with stringing the guitar through the bridge, making sure it’s all the way taught, bringing it up past the string posts. I measure about 3 posts beyond the one I am striging and cut. This will allow for roughly 3 winds.

9. Lubricate the Nut And Saddles. Lubricating the nut and saddles will help keep your guitar in tune and stable. There are many different products designed to do just that (i.e. Big Bends Nut Sauce), but I have learned that using lead from a no.2 pencil does the job just right and most people will have a pencil lying around their house. Make sure it’s extra sharp and draw a few even lines in each slot and on the grooves of the saddles. This allows the string to vibrate freely without getting snagged on any loose particles in the nut slots or saddles, and is especially helpful with guitars that have tremolos. It’s good to loosen the strings some to allow yourself to work on the nut and saddles.
10. Adjust the height of the pickups. After you tune the guitar back to pitch, it’s time to dial in your pickups. I could go further in depth as to what the correct measurements should be, but simply put, use your ears. I start off by measuring all the pickups with my right hand index finger on the bass and treble sides while holding down all of the strings with my left hand, getting them all to an even position adjusting from there to my ears liking. A general rule is that the closer the pickup is to the string, the louder it will sound. If you’re going for something more dynamic, adjust the pickup further into the body. I tend to like my pickups closer to the string at the bass side and further away at the treble side. (Tip: Remember that the pickups are magnets so be careful not to hit the pole pieces with your screwdriver; you could potentially damage the pickup.)


11. Intonation. There is often a lot of confusion when it comes to intonation, but it’s really more simple than people may realize. Intonation is making sure that the instrument is in tune at the 12th fret octave to its designated open string. Many guitar bridges/saddles are different - some have individual saddles allowing for each string to intonate and some strings share saddles (i.e. vintage Telecasters) and are oftentimes not compensated. First, plug into a strobe tuner. (There is an app by Peterson for your phone, or a regular tuner will do just fine). Turn your tone knobs down all the way for a more accurate reading and tune your guitar. Start with the lowest string and fret the octave at the 12th fret. The note should be the same, but chances are it will either be sharp or flat. If it’s too sharp, simply tighten the adjustment screw a few times (bringing the saddle closer to the back of the bridge), re-tune the open string, and check the 12th fret again. If it’s too flat, simply loosen the adjustment screw a few turns (bringing the saddle further away from the bridge), re-tune, and check the 12th fret again and repeat. If it’s hard making the adjustment, simply detune the string so it’s loose and lift the string off of its saddle and then make the proper adjustments. The tension often makes it difficult for the adjustment screw to turn, which may cause you to strip out a screw. (Note: It’s good to check the height of all the saddles again after making your intonation adjustments as sometimes the height of each saddle will move depending on how much you adjusted the intonation screws.)

12. Play your instrument. Now play your instrument again. How does it feel? How does it sound? Wait…it sounds off? You probably left your tone knobs all the way down when you were adjusting the intonation, so turn those up and now let’s hear your instrument again. Does it play differently? If all went according to plan you should notice a difference in the playability and tone of your instrument. If something still feels off, go through each of these steps again and check all the measurements. Sometimes truss rods move even a few minutes after adjustment and if you're not making exact measurements with a straightedge and feeler gauges it’s tough to know exactly where it is. Your eyes can also play tricks on you so it’s always good to double check your work.
Every instrument has its own identity, and with that its own set of issues. In the end, they all can play and sound better with a little bit of time, care, and patience. At the very least, I hope you now have a deeper understanding of what exactly goes into a basic setup. You may not have good luck with doing this on your own, and that’s okay. Like everything else, it takes patience and practice. If you still have trouble getting your instrument to play right, there are many professionals out there to give your instrument the care and maintenance that it needs to perform. Support those people if you can, now more than ever.
Recommended reading:
Guitar Player Repair Guide by Dan Erlewine
How to Make Your Guitar Play Great by Dan Erlewine
Guitarist’s Guide Maintenance and Repair by Doug Redler and Dave Rubin
Electronic Projects for Musicians by Craig Anderton
Guitar Electronics for Musicians by Donald Brosnac
Patrick Benson is a musician, and guitar repair tech based in Los Angeles, California. He works at a repair shop as well as out on the road for Nine Inch Nails and Beck. He plays guitar in the band Charade, has a solo instrumental project and hosts a monthly podcast. You can follow him on Instagram and Twitter.